DesignCad
- Started
- What's New V.4.7
- Getting Started
- Home Screen
- Dxf Send/Receive
- Model Design
- Point Operations
- Grading
- Pieces Operations
- Plot Piece
- Print Piece
- Measurement
- Sewing Processes
- Dart/Pleat Operations
- Internal Shape / Internal Point
- Marker Operations
- Marker Print
- Super Marker
- Technical Card Operations
- Cost
- Plot Marker
- Options
Walk Piece
Used to check whether the piece lines and seam lines of two pieces to be joined match, by walking one piece along the line of the other. At joins such as sleeve – armhole, side seam and shoulder, notch shifts and length differences can be seen before sewing; if desired, matching points or notches are added to both pieces at the same distance.
1.) In the Pattern Design screen, from the Piece menu, click Walk Piece  .
2.) With the mouse, select the start point and the direction point of the piece that will stay fixed.
3.) Select the start point and the direction point of the piece that will move.
4.) As you move the mouse, the moving piece walks along the line of the fixed piece. The walked length and the line difference are shown on the screen.
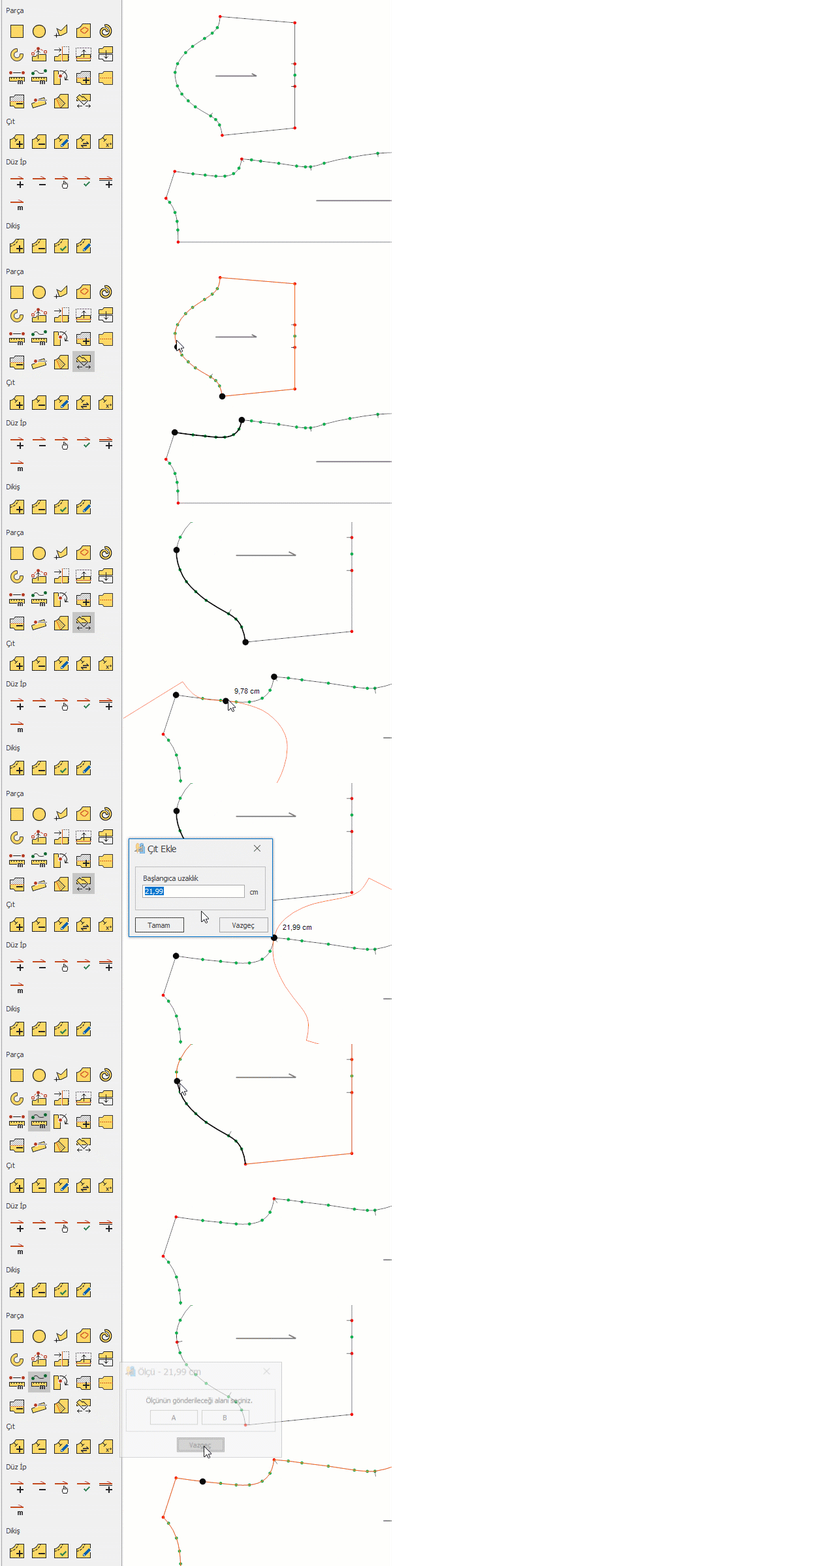
5.) At the desired position, press the right mouse button and select an action from the menu that opens:
- Add Point: Adds a corner point to both pieces at the same distance from the start.
- Add Notch: Adds a notch to both pieces at the same distance from the start. (the most recently used notch type is added)
- Add Point at End: Adds a point only to the moving piece, at a distance equal to the length of the line selected on the fixed piece.
When Add Point or Add Notch is selected, the Distance to start value in the window that opens is filled in with the current position; change it if needed and confirm with Ok.
 Press the K key on the keyboard to switch between the piece line and the seam line. Press the Y key to reverse the walking direction of the moving piece (use it if the direction point was selected on the wrong side).
Walking does not change the shape of the pieces; only the points and notches added from the right-click menu are applied to the pieces. If one of the pieces already has a point at the position to be added, nothing is added.