DesignCad
- Started
- What's New V.4.7
- Getting Started
- Home Screen
- Dxf Send/Receive
- Model Design
- Point Operations
- Grading
- Pieces Operations
- Plot Piece
- Print Piece
- Measurement
- Sewing Processes
- Dart/Pleat Operations
- Internal Shape / Internal Point
- Marker Operations
- Marker Print
- Super Marker
- Technical Card Operations
- Cost
- Plot Marker
- Options
Add Marker
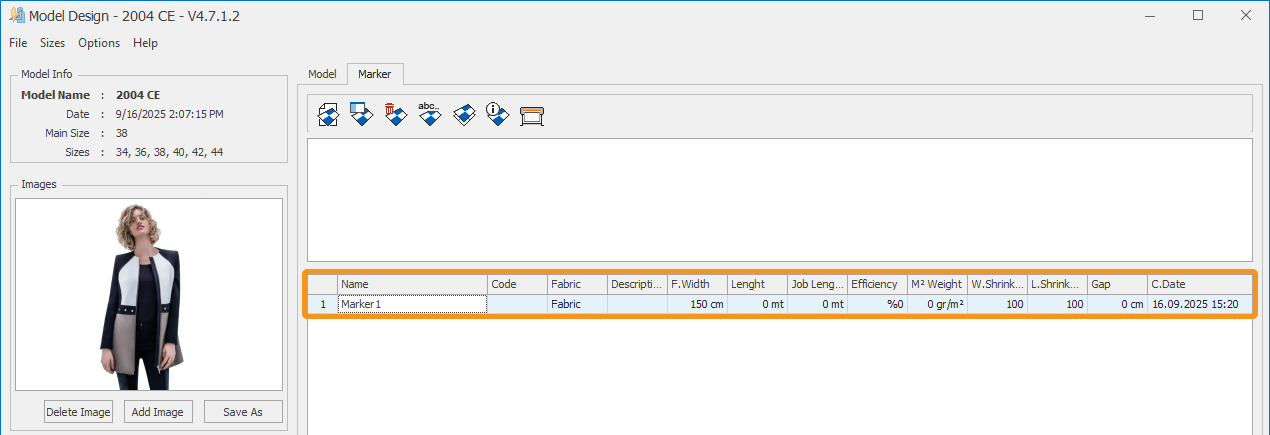
Used to create a marker plan from pieces within the current model or from different models.
After the model is opened in the Model Design window, click the Marker tab and select Add Marker ![]()

The Add New Marker window opens.
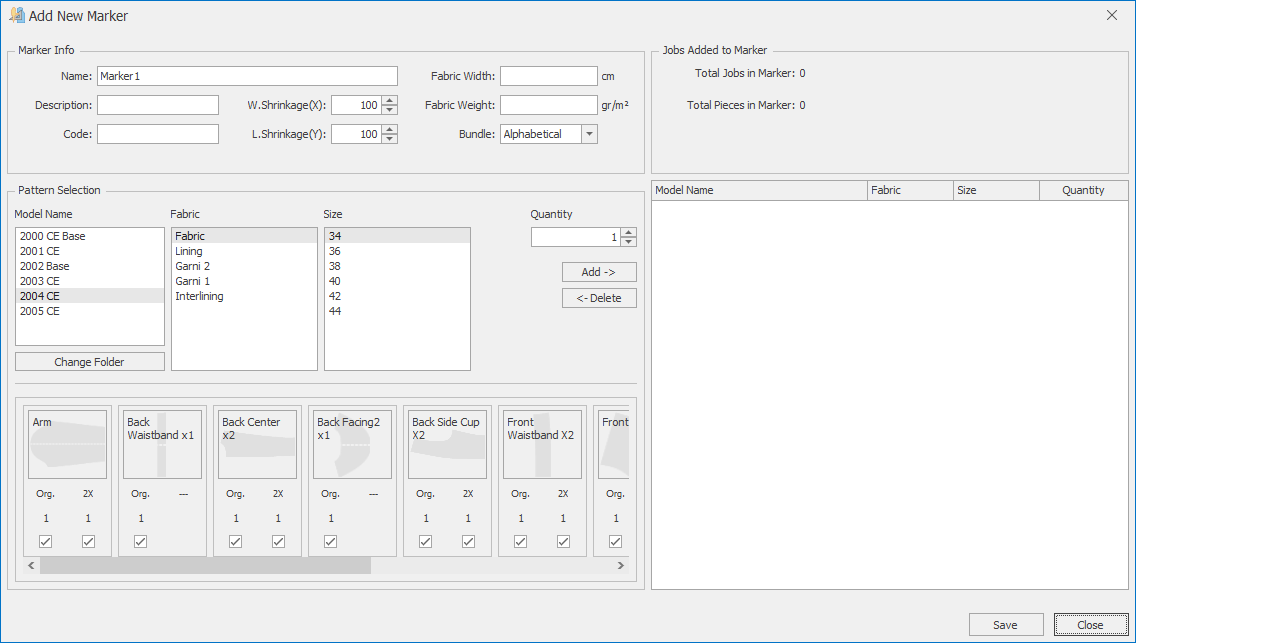
In the window that opens, enter the marker details in the Marker Info section:

Name: Enter the name of the marker. (This field is automatically generated as Marker1, Marker2, etc.)
Description: Enter a description related to the marker. (Optional – can be left blank.)
Code: Enter the code information related to the marker. (Optional – can be left blank.)
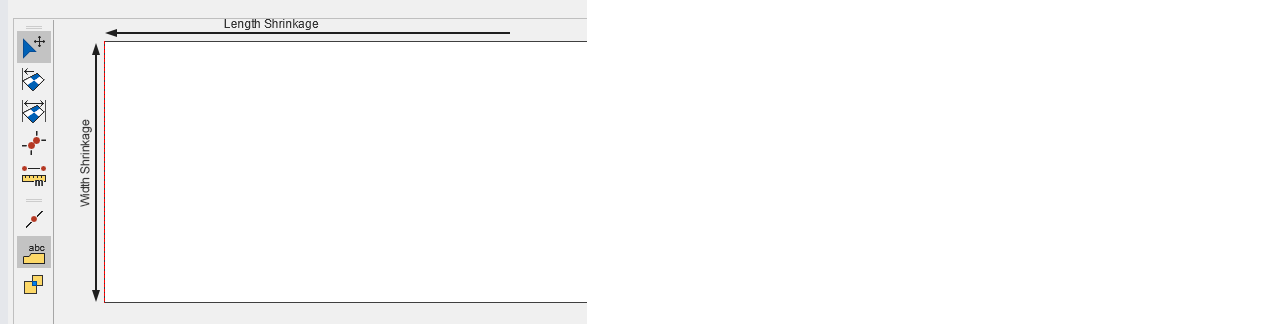
W.Shrinkage and L.Shrinkage: Specify the shrinkage values of the marker as percentages.
- Width Shrinkage represents the fabric opening direction.
- Length Shrinkage represents the fabric width direction.
(For example: if a 5% shrinkage is to be applied in warp, enter Warp Shrinkage: 105. If a 5% extension is to be applied, enter Warp Shrinkage: 95.)
Fabric Width: Enter the value according to the fabric width from which the marker will be cut. This value can be modified later from the marker screen. (For example: for a fabric with a width of 160 cm, if a 1 cm margin is left on each side, enter Fabric Width: 158 cm.)
Fabric Weight: If preparing a marker plan for cutting knitted fabric and unit weight calculation is required, enter the fabric’s unit weight in g/m². (This information is important for cost calculations.)
Bundle: Used to classify the sizes used in the model. Bundle selection is made according to the size values (alphabetic/numeric).
- For numeric sizes, select alphabetic bundles. (Example: if size values are 36, 38, 40, and 42, select alphabetic bundles. For cutting size 36, it will be named 36A, 36B, 36C, and 36D.)
- For alphabetic sizes, select numeric bundles. (Example: if size values are S, M, L, and XL, select numeric bundles. For cutting size S, it will be named S1, S2, S3, and S4.)
From the Marker Selection section, select the model, fabric, and fabric pieces to be included in the marker.

![]() Model Name: The model under which the marker will be prepared.
Model Name: The model under which the marker will be prepared.
![]() Change Folder: If models are to be added to the prepared marker from different folders or the same folder, click the Change Folder icon. In the window that opens, select the desired model from the desired folder and include it in the marker plan.
Change Folder: If models are to be added to the prepared marker from different folders or the same folder, click the Change Folder icon. In the window that opens, select the desired model from the desired folder and include it in the marker plan.
![]() Fabric: Select the fabric from the model according to which the marker will be prepared.
Fabric: Select the fabric from the model according to which the marker will be prepared.
![]() After the fabric is selected, the pieces belonging to that fabric appear in the lower bar. Before adding them to the marker, you may uncheck the box under a piece to exclude it from the marker. (Uncheck the direction that should not be included.)
After the fabric is selected, the pieces belonging to that fabric appear in the lower bar. Before adding them to the marker, you may uncheck the box under a piece to exclude it from the marker. (Uncheck the direction that should not be included.)
![]() Size: Select the sizes to be included in the marker plan. (Hold down the left mouse button and drag to select all, use the CTRL key to select different sizes, or the SHIFT key to select a range of sizes.)
Size: Select the sizes to be included in the marker plan. (Hold down the left mouse button and drag to select all, use the CTRL key to select different sizes, or the SHIFT key to select a range of sizes.)
![]() Quantity (Assortment): Enter the number of sizes to be included in the marker plan for each selected piece.
Quantity (Assortment): Enter the number of sizes to be included in the marker plan for each selected piece.
![]() Click the Add button to include the selected pieces in the marker plan. The added pieces appear in the Pieces Added to Marker section.
Click the Add button to include the selected pieces in the marker plan. The added pieces appear in the Pieces Added to Marker section.
![]() Click the Delete button to remove a size from the marker.
Click the Delete button to remove a size from the marker.
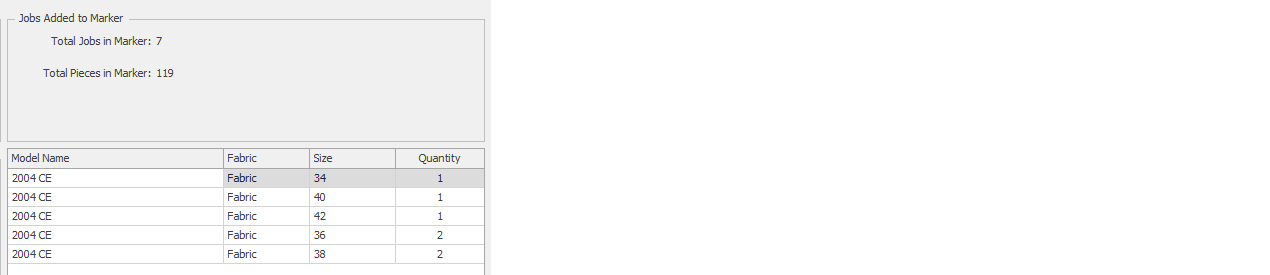
From the Jobs Added to Marker section, the total number of jobs and pieces in the marker can be checked.
For example, if one piece each of sizes 34, 40, and 42, and two pieces each of sizes 36 and 38 are included in the marker, the total number of jobs in the marker will be seven, and the total number of pieces will be 119.
After all operations are completed, click the Save button to create the marker plan, and the created marker will be added to the marker list.